FVCOM: ideal estuary model
This tutorial gives an end to end example how to install and then use FVCOM-ERSEM with an ideal estuary model on a high performance computing (HPC) machine. We have used PML’s in house machine, CETO. Unlike the other tutorials in this section we go through setting up FVCOM-ERSEM on the HPC machine and then running and plotting the results.
This tutorial is based on the scripts found in the ERSEM’s setups repository. The individual scripts can be found in the ideal_estuary folder.
Note
You will need to get access to the UK-FVCOM GitLab repo.
Building and running FVCOM-ERSEM
The three key packages required to run this tutorial are:
Both ERSEM and FABM are freely available on GitHub, however, for UK-FVCOM you will have to register for the code – see note above.
An example build script is as follows:
 1#!/usr/bin/env bash
 2
 3module load intel-mpi/5.1.2 netcdf-intelmpi/default intel/intel-2016 hdf5-intelmpi/default
 4
 5SCRIPT_DIR="$( cd "$( dirname "${BASH_SOURCE[0]}" )" &> /dev/null && pwd )"
 6CODE_DIR=$SCRIPT_DIR/code
 7INSTALL_DIR=$SCRIPT_DIR/model
 8
 9num_cpu=$(nproc)
10
11website=("git@github.com:UK-FVCOM-Usergroup/uk-fvcom.git" "git@github.com:pmlmodelling/ersem.git" "git@github.com:fabm-model/fabm.git")
12name=("uk-fvcom" "ersem" "fabm")
13branch=("FVCOM-FABM" "master" "master")
14
15mkdir $CODE_DIR
16cd $CODE_DIR
17
18echo "Obtaining source code"
19for i in 0 1 2
20do
21    git clone ${website[i]} ${name[i]}
22    cd ${name[i]}
23    git checkout ${branch[i]}
24    cd $CODE_DIR
25done
26
27cd $SCRIPT_DIR
28
29FABM=$CODE_DIR/fabm/src
30ERSEM=$CODE_DIR/ersem
31FABM_INSTALL=$INSTALL_DIR/FABM-ERSEM
32FC=$(which mpiifort)
33
34mkdir -p $FABM_INSTALL
35
36cd $FABM
37mkdir build
38cd build
39# Production config:
40cmake $FABM -DFABM_HOST=fvcom -DFABM_ERSEM_BASE=$ERSEM -DCMAKE_Fortran_COMPILER=$FC -DCMAKE_INSTALL_PREFIX=$FABM_INSTALL
41make install -j $num_cpu
42
43cd $SCRIPT_DIR
44
45sed -i 's|BASE_SETUP_DIR|'"$SCRIPT_DIR"'|g' make_ideal_estuary.inc
46ln -s $SCRIPT_DIR/make_ideal_estuary.inc $SCRIPT_DIR/code/uk-fvcom/FVCOM_source/make.inc
47
48# Installing FVCOM additional packages (METIS, Proj, etc)
49cd $SCRIPT_DIR/code/uk-fvcom/FVCOM_source/libs
50mv makefile makefile_
51ln -s makefile.CETO makefile
52make -j $num_cpu
53
54# Building FVCOM
55cd ..
56make -j $num_cpu
Here you will have to adapt the script to ensure you are using the right HPC modules and the corresponding compilers. The important compiler is the fortran one which is set with the variable FC.
Another key file to change is the make.inc file, here again you will
need to change the compilers to reflect the modules you are using on the
HPC machine. For example, on lines 74 and 75 IOLIBS and IOINCS are
set, these would need to be change to reflect the modules on the HPC machine
you are using.
make.inc file
  1#/===========================================================================/
  2#
  3# PML ceto makeinc for the ideal estuary model
  4#
  5#/===========================================================================/
  6
  7#==========================================================================
  8#
  9#    WELCOME TO FVCOM
 10#
 11#    TO BUILD FVCOM, PLEASE SET THE FOLLOWING IN THIS FILE:
 12#        TOPDIR - the directory this make.inc file is in
 13#        LIBDIR - the directroy where libraries are installed
 14#        INCIDR - the directroy where include files are installed
 15#
 16#        CHOOSE YOUR MODEL OPTIONAS - The Def Flags!
 17#
 18#        CHOOSE A COMPILER FROM THE LIST OR CREATE YOUR OWN
 19#
 20#    You can also use the makefile to build and install some of the libraries
 21#    used by fvcom. Set the INSTALLDIR and choose the 'LOCAL INSTALL' option
 22#    below. Select an non-mpi compiler from the list and run 'make libs_ext'
 23#
 24#    Good Luck!
 25#
 26
 27#========== TOPDIR ========================================================
 28# TOPDIR is the directory in which this make file and the fvcom source reside
 29
 30           TOPDIR        =  BASE_SETUP_DIR/code/uk-fvcom/FVCOM_source
 31# TOPDIR must be set!
 32
 33#========== INSTALLDIR =====================================================
 34# INSTALLDIR is the directory where you wish to install external libraries
 35# The default is in the $(TOPDIR)/libs/install, but you can choose...
 36            INSTALLDIR    = $(TOPDIR)/libs/install
 37#===========================================================================
 38
 39# PREPROCESSOR OPTIONS FOR CPP
 40            DEF_FLAGS     = -P -traditional
 41#===========================================================================
 42
 43####################### MEDM ENVIRONMENT #####################################
 44# Use the environmental variables, LIBPATH and INCLUDEPATH, set by MODULE
 45# to find the packages used by this build.
 46colon=:
 47empty=
 48dashI= $(empty) -I
 49dashL= $(empty) -L
 50# ### UNCOMMENT HERE!
 51#             LIBDIR       =  -L$(subst $(colon),$(dashL),$(LIBPATH))
 52#             INCDIR       =  -I$(subst $(colon),$(dashI),$(INCLUDEPATH))
 53
 54###########################################################################
 55
 56# LOCAL INSTAL
 57             LIBDIR       =  -L$(INSTALLDIR)/lib
 58             INCDIR       =  -I$(INSTALLDIR)/include
 59
 60#--------------------------------------------------------------------------
 61#  STANDARD LIBRARIES FOR DATA AND TIME IN fVCOM:
 62#
 63             DTLIBS       = -ljulian
 64             DTINCS       =
 65#
 66#--------------------------------------------------------------------------
 67#        NETCDF OUTPUT      NETCDF IS NOW REQUIRED TO COMPILE FVCOM
 68#                           DUMP OUTPUT INTO NETCDF FILES (yes/no)
 69#                           REQUIRES SYSTEM DEPENDENT NETCDF LIBRARIES
 70#                           COMPILED WITH SAME F90 COMPILER
 71#                           SET PATH TO LIBRARIES WITH IOLIBS
 72#                           SET PATH TO INCLUDE FILES (netcdf.mod) WITH IOINCS
 73#--------------------------------------------------------------------------
 74             IOLIBS       = -L/gpfs1/apps/netcdf/intelmpi/lib -lnetcdff -lnetcdf -lhdf5_hl -lhdf5 -lz -lm
 75             IOINCS       = -I/gpfs1/apps/netcdf/intelmpi/include -I/gpfs1/apps/hdf5/intelmpi/include
 76#--------------------------------------------------------------------------
 77
 78
 79#==========================================================================
 80#  BEGIN USER DEFINITION SECTION
 81#==========================================================================
 82#        SELECT MODEL OPTIONS
 83#          SELECT FROM THE FOLLOWING OPTIONS BEFORE COMPILING CODE
 84#          SELECT/UNSELECT BY COMMENTING/UNCOMMENTING LINE (#)
 85#          CODE MUST BE CLEANED (with "make clean") AND
 86#          RECOMPILED IF NEW SET OF OPTIONS IS DESIRED
 87#--------------------------------------------------------------------------
 88
 89
 90#--------------------------------------------------------------------------
 91#        PRECISION          DEFAULT PRECISION: SINGLE
 92#                           UNCOMMENT TO SELECT DOUBLE PRECISION
 93#--------------------------------------------------------------------------
 94
 95#            FLAG_1 =  -DDOUBLE_PRECISION
 96
 97## SINGLE PRECISION OUTPUT FOR VISIT
 98            FLAG_1 =  -DDOUBLE_PRECISION -DSINGLE_OUTPUT -DNETCDF4_COMPRESSION
 99#            FLAG_1 =  -DSINGLE_OUTPUT -DNETCDF4_COMPRESSION
100
101#--------------------------------------------------------------------------
102#        SPHERICAL          SELECT SPHERICAL COORDINATES FOR INTEGRATION
103#                           DEFAULT: CARTESIAN
104#                           UNCOMMENT TO SELECT SPHERICAL COORDINATES
105#--------------------------------------------------------------------------
106
107#            FLAG_2 = -DSPHERICAL
108
109#--------------------------------------------------------------------------
110#        FLOODYING/DRYING   INCLUDE WET/DRY TREATMENT OF DOMAIN
111#                           CAN BE ACTIVATED/DEACTIVATED AT RUN TIME WITH
112#                           INPUT FILE CONTROL.  (SEE exa_run.dat) FILE
113#                           DEFAULT: NO FLOODYING/DRYING INCLUDED
114#                           UNCOMMENT TO INCLUDE FLOODYING/DRYING
115#--------------------------------------------------------------------------
116
117             FLAG_3 = -DWET_DRY
118
119#--------------------------------------------------------------------------
120#        MULTI_PROCESSOR    INCLUDES PARALLELIZATION WITH MPI
121#                           REQUIRES LINKING MPI LIBRARIES OR COMPILING
122#                           WITH A PRELINKED SCRIPT (mpif90/mpf90/etc)
123#                           DEFAULT: NO PARALLEL CAPABILITY
124#                           UNCOMMENT TO INCLUDE MPI PARALLEL CAPABILITY
125#--------------------------------------------------------------------------
126
127             FLAG_4 = -DMULTIPROCESSOR
128             PARLIB = -lmetis -L$(LIBDIR)
129
130#--------------------------------------------------------------------------
131#        WATER_QUALITY      INCLUDE EPA WATER QUALITY MOD
132#                           CAN BE ACTIVATED/DEACTIVATED AT RUN TIME WITH
133#                           VARIABLE WQM_ON IN INPUT FILE
134#                           DEFAULT: NO WATER QUALITY MODEL
135#                           UNCOMMENT TO INCLUDE WATER QUALITY MODEL
136#--------------------------------------------------------------------------
137
138#             FLAG_5 = -DWATER_QUALITY
139
140#--------------------------------------------------------------------------
141#        PROJECTION         A Fortran90 wrapper for the Cartographic projection
142#                           Software, proj4.
143#                           Proj can be obtained from:
144#                           http://www.remotesensing.org/proj/
145#                           Thanks to: USGS
146#
147#                           The Proj fortran bindings can be obtained from:
148#                           http://forge.nesc.ac.uk/projects/glimmer/
149#                           Thanks to: Magnus Hagdorn (Magnus.Hagdorn@ed.ac.uk)
150#
151#                           !! NOTE THAT THE PROJ 4 LIBRARY MUST BE IN YOUR
152#                           LD_LIBRARY_PATH FOR DYNAMIC LOADING!!
153#
154#--------------------------------------------------------------------------
155
156             FLAG_6 = -DPROJ
157
158             PROJLIBS       = -L$(LIBDIR) -lfproj4 -lproj -lm
159             PROJINCS       = -I$(INCDIR)
160
161#--------------------------------------------------------------------------
162#        DATA_ASSIMILATION  INCLUDE NUDGING BASED DATA ASSIMILATION FOR
163#                           CURRENT/TEMP/SALINITY/SST
164#                           CAN BE ACTIVATED/DEACTIVATED AT RUN TIME WITH
165#                           INPUT FILE CONTROL.  (SEE exa_run.dat) FILE
166#                           DEFAULT: NO DATA ASSIMILATION INCLUDED
167#                           UNCOMMENT TO INCLUDE DATA ASSIMILATION
168#--------------------------------------------------------------------------
169
170#             FLAG_7 = -DDATA_ASSIM
171#             include ${PETSC_DIR}/bmake/common/variables
172#             OILIB  = -lmkl_lapack -lmkl_em64t -lguide -lpthread
173
174#             OILIB  = -L/gpfs1/apps/intel/mkl/lib/em64t/ -lmkl_lapack95_ilp64 -lmkl_intel_ilp64 -lmkl_core -lmkl_sequential
175
176# For Build on em64t computer (Guppy)
177#             LIBDIR = $(LIBDIR) -L/usr/local/lib64
178# For Build on Cluster (Typhoeus and Hydra)
179#             LIBDIR = $(LIBDIR) -L/usr/local/lib/em64t
180# For i386 computers at SMAST (salmon and minke)
181#   NO NEED TO ADD ANYTHING LIBS ARE IN THE DEFAULT PATH
182
183#--------------------------------------------------------------------------
184#        IN UPWIND LEAST SQUARE SCHEME:
185#        LIMITED_NO: NO LIMITATION
186#        LIMITED_1 : FIRST ORDER LIMITATION
187#        LIMITED_2 : SECOND ORDER LIMITATION(  )
188#   !!!!!! ONLY ONE OF THE FLAGS BELOW CAN BE AND MUST BE CHOSEN
189#--------------------------------------------------------------------------
190
191            FLAG_8 =  -DLIMITED_NO
192
193#--------------------------------------------------------------------------
194#  Semi-Implicit time stepping method
195#--------------------------------------------------------------------------
196
197#             FLAG_9 = -DSEMI_IMPLICIT
198#             include ${PETSC_DIR}/bmake/common/variables
199
200
201#---------------------------------------------------------------------------
202#       SOLID BOUNDARY     IF GCN, NO GHOST CELL
203#                          IF GCY1, GHOST CELL IS SYMMETRIC RELATIVE TO BOUNDARY
204#                          CELL EDGE
205#                          IF GCY2, GHOST CELL IS SYMMETRIC RELATIVE TO MIDDLE
206#                          POINT OF THE BOUNDARY CELL EDGE
207#---------------------------------------------------------------------------
208
209             FLAG_10  = -DGCN
210
211#--------------------------------------------------------------------------
212#        TURBULENCE MODEL   USE GOTM TURBULENCE MODEL INSTEAD OF THE ORIGINAL
213#                           FVCOM MELLOR-YAMADA 2.5 IMPLEMENTATION
214#                           UNCOMMENT TO USE GOTM TURBULENCE MODEL
215#        NOTE: You Must Build GOTM 4.x, GOTM 3.x used a different
216#              do_turbulence interface and will not work.
217#--------------------------------------------------------------------------
218
219#            FLAG_11 = -DGOTM
220#            GOTMLIB       = -L../GOTM_source/ -lturbulence -lutil -lmeanflow
221#            GOTMINCS      = -I../GOTM_source/
222
223#--------------------------------------------------------------------------
224#       EQUILIBRIUM TIDE
225#--------------------------------------------------------------------------
226
227#            FLAG_12 = -DEQUI_TIDE
228
229#--------------------------------------------------------------------------
230#       ATMOSPHERIC TIDE
231#--------------------------------------------------------------------------
232
233#            FLAG_13 = -DATMO_TIDE
234
235#--------------------------------------------------------------------------
236#       RIVER DISTRIBUTION OPTION:
237#       THE STANDARD NAME LIST USES A CHARACTER STRING TO SET A FUNCION
238#       DISTROBUTION. YOU CAN OPTIONALLY SPECIFY TO USE THE OLD STYLE,
239#       FLOATING POINT DISTROBUTION HERE. USE THIS WHEN CONVERTING OLD-STYLE
240#       RIVER INPUT FILES!
241#--------------------------------------------------------------------------
242
243#            FLAG_14 = -DRIVER_FLOAT
244
245#--------------------------------------------------------------------------
246#        Using A fully multidimensional positive definite advection
247#        transport algorithm with small implicit diffusion.
248#        Based on Smolarkiewicz, P. K; Journal of Computational
249#        Physics, 54, 325-362, 1984
250#--------------------------------------------------------------------------
251
252            FLAG_15 =  -DMPDATA -DTVD
253
254#--------------------------------------------------------------------------
255#         Run Two-D Barotropic Mode Only
256#--------------------------------------------------------------------------
257
258#             FLAG_16 = -DTWO_D_MODEL
259
260#--------------------------------------------------------------------------
261#         Output 2-D Momentum Balance Checking
262#--------------------------------------------------------------------------
263
264#            FLAG_17 = -DBALANCE_2D
265
266#--------------------------------------------------------------------------
267#           OPEN BOUNDARY FORCING TYPE
268#           DEFAULT: OPEN BOUNDARY NODE WATER ELEVATION FORCING
269#           UNCOMMENT TO SELECT BOTH OPEN BOUNDARY NODE WATER ELEVATION
270#           FORCING AND OPEN BOUNDARY VOLUME TRANSPORT FORCING
271#---------------------------------------------------------------------------
272
273#            FLAG_18 = -DMEAN_FLOW
274
275#--------------------------------------------------------------------------
276#           OUTPUT TIDAL INFORMATION AT NTIDENODE and NTIDECELL
277#           FOR MEANFLOW CALCULATION.
278#---------------------------------------------------------------------------
279
280#            FLAG_19 = -DTIDE_OUTPUT
281
282#--------------------------------------------------------------------------
283#           dye release
284#---------------------------------------------------------------------------
285
286#            FLAG_20 = -DDYE_RELEASE
287
288#--------------------------------------------------------------------------
289#        SUSPENDED SEDIMENT MODEL:   UNCOMMENT TO INCLUDE MODEL
290# ORIG : the sediment transport model developed by Geoffey Cowles in v3.1-v3.2
291# CSTMS: Community Sediment Transport Modeling System with cohesive model
292# DELFT: Sediment modeling system as Delft Flow (not included)
293#
294# note: only one model should be chosen for modeling.
295#
296#  Utilities:
297#    OFFLINE_SEDIMENT : run sediment with offline hydrodynamic forcing
298#    FLUID_MUD : activate the 2-D fluid mud at bed-water interface
299#--------------------------------------------------------------------------
300
301            FLAG_21 =  -DSEDIMENT
302            FLAG_211 = -DORIG_SED
303#            FLAG_211 = -DCSTMS_SED
304#
305#            FLAG_22 =  -DOFFLINE_SEDIMENT
306#            FLAG_43 =  -DFLUID_MUD
307#
308#--------------------------------------------------------------------------
309#         KALMAN FILTERS
310#--------------------------------------------------------------------------
311
312#              FLAG_23 = -DRRKF
313#              FLAG_23 = -DENKF
314#             include ${PETSC_DIR}/bmake/common/variables
315#              KFLIB  = -lmkl_lapack -lmkl_em64t -lguide -llapack -lblas
316
317# For Build on em64t computer (Guppy)
318#             LIBDIR = $(LIBDIR) -L/usr/local/lib64
319# For Build on Cluster (Typhoeus and Hydra)
320#             LIBDIR = $(LIBDIR) -L/usr/local/lib/em64t
321# For i386 computers at SMAST (salmon and minke)
322#   NO NEED TO ADD ANYTHING LIBS ARE IN THE DEFAULT PATH
323
324#--------------------------------------------------------------------------
325#         Run One-D Mode with Biological Model
326#--------------------------------------------------------------------------
327
328#             FLAG_24 = -DONE_D_MODEL
329
330#--------------------------------------------------------------------------
331#       GENERAL BIOLOGICAL MODEL:    UNCOMMENT TO INCLUDE MODEL
332#--------------------------------------------------------------------------
333            FLAG_25 = -DFABM  #-DOFFLINE_FABM  # -DFABM_DIAG_OUT
334            BIOLIB       = -LBASE_SETUP_DIR/model/FABM-ERSEM/lib -lfabm
335            BIOINCS      = -IBASE_SETUP_DIR/model/FABM-ERSEM/include -IBASE_SETUP_DIR/model/FABM-ERSEM/include/yaml
336
337#--------------------------------------------------------------------------
338#         Dynamic/Thermodynamic Ice
339#--------------------------------------------------------------------------
340
341# NOTE: Must use -DSPHERICAL  and -DHEAT_FLUX ----- this note only for old version v2.7
342#       ICE_EMBEDDING must with SEMI_IMPLICIT
343#            FLAG_26 = -DICE
344#            FLAG_261 = -DICE_EMBEDDING
345
346#--------------------------------------------------------------------------
347#         CALCULATE THE NET HEAT FLUX IN MODEL (THREE CHOICES):
348#         1. CALCULATE THE NET HEAT FLUX USING COARE26Z
349#         2. CALCULATE THE NET HEAT FLUX USING COARE26Z for Great Lake
350#         3. CALCULATE THE NET HEAT FLUX USING SOLAR HEATING MODULE
351#--------------------------------------------------------------------------
352
353#            FLAG_27 = -DHEATING_CALCULATED
354#            FLAG_27 = -DHEATING_CALCULATED_GL
355#            FLAG_27 = -DHEATING_SOLAR
356
357#--------------------------------------------------------------------------
358#         AIR_PRESSURE FROM SURFACE FORCING
359#--------------------------------------------------------------------------
360
361#             FLAG_28 = -DAIR_PRESSURE
362
363#--------------------------------------------------------------------------
364# Visit online simulation mode
365#--------------------------------------------------------------------------
366
367#            FLAG_29 = -DVISIT
368
369#      VISITLIB     = -lm -ldl -lsimf -lsim -lpthread
370#      VISITLIBPATH = $(LIBDIR)
371#      VISITINCPATH = $(INCDIR)
372
373
374# USE DEVELOPER INSTALL VISIT
375#      VISITLIBPATH =
376#      VISITLIB     =  -lm -ldl -lsimf -lsim -lpthread
377#      VISITINC     =
378
379#--------------------------------------------------------------------------
380#        NON-HYDROSTATIC MODEL:
381#--------------------------------------------------------------------------
382
383#             FLAG_30 =  -DNH
384#             include ${PETSC_DIR}/bmake/common/variables
385
386#--------------------------------------------------------------------------
387#        PARTICLE TRACKING
388#--------------------------------------------------------------------------
389
390#             FLAG_31 =  -DLAG_PARTICLE
391
392#--------------------------------------------------------------------------
393#        WAVE-CURRENT INTERACTION
394#--------------------------------------------------------------------------
395#             FLAG_32 =  -DWAVE_CURRENT_INTERACTION
396#             FLAG_33 =  -DPLBC
397#           NOTE! THis option is for wave code
398#             FLAG_34 =  -DEXPLICIT
399#           WAVE ONLY
400#             FLAG_35 = -DWAVE_ONLY
401# Svendsen Roller contribution
402#             FLAG_36 = -DWAVE_ROLLER
403#             FLAG_37 = -DWAVE_OFFLINE
404#             include ${PETSC_DIR}/bmake/common/variables
405#--------------------------------------------------------------------------
406#        THIN-DAM MODEL
407#--------------------------------------------------------------------------
408#             FLAG_38 = -DTHIN_DAM
409
410#--------------------------------------------------------------------------
411#        PWP MIXED LAYER MODEL:
412#--------------------------------------------------------------------------
413
414#            FLAG_39 =  -DPWP
415
416#--------------------------------------------------------------------------
417#        VERTICAL ADVECTION LIMITER:
418#        FOR S-COORDINATES, DON'T USE THIS FLAG
419#--------------------------------------------------------------------------
420
421#           FLAG_40 =  -DLIMITER_VER_ADV
422
423#--------------------------------------------------------------------------
424#        PETSC Version
425#        If your PETSc is 2.3.2 or older, uncomment this flag
426#--------------------------------------------------------------------------
427#             FLAG_41 = -DOLD_PETSC
428
429#--------------------------------------------------------------------------
430#        SPECIAL PARTITION
431#        This flag can make sure the identical repeat run for same amount of CPUs
432#--------------------------------------------------------------------------
433             FLAG_42 = -DPARTITION_SPECIAL
434
435#--------------------------------------------------------------------------
436#        DEVELOPMENT FLAGS
437#            FOR BETA WORK ONLY
438#--------------------------------------------------------------------------
439
440#             FLAG_101 = -DDEVELOP1
441#             FLAG_102 = -DDEVELOP2
442#             FLAG_103 = -DDEVELOP3
443#             FLAG_104 = -DDEVELOP4
444#             FLAG_105 = -DDEVELOP5
445
446#--------------------------------------------------------------------------
447#        SELECT COMPILER/PLATFORM SPECIFIC DEFINITIONS
448#          SELECT FROM THE FOLLOWING PLATFORMS OR USE "OTHER" TO DEFINE
449#          THE FOLLOWING VARIABLES:
450#          CPP:  PATH TO C PREPROCESSOR
451#           FC:  PATH TO FORTRAN COMPILER (OR MPI COMPILE SCRIPT)
452#          OPT:  COMPILER OPTIONS
453#       MPILIB:  PATH TO MPI LIBRARIES (IF NOT LINKED THROUGH COMPILE SCRIPT)
454#--------------------------------------------------------------------------
455#--------------------------------------------------------------------------
456#  Intel/MPI Compiler Definitions (PML)
457#--------------------------------------------------------------------------
458         CPP      = mpiicc -E
459         COMPILER = -DINTEL
460         FC       = mpiifort
461         DEBFLGS  =  #-check all
462         OPT      = -O3 -L/gpfs1/apps/intel/compilers_and_libraries/linux/mpi/intel64/lib -I/gpfs1/apps/intel/compilers_and_libraries/linux/mpi/intel64/include/ -xHost #-init=zero -init=arrays -ftrapuv
463         CLIB     =
464         CC       = mpiicc
465         CFLAGS   =
466#--------------------------------------------------------------------------
467#  Intel/MPI Compiler Definitions (PML) Debugging
468#--------------------------------------------------------------------------
469#         COMPILER = -DIFORT
470#         CPP      = /lib/cpp
471#         CPPFLAGS = $(DEF_FLAGS) -P -traditional -DINTEL CPPMACH=-DNOGUI -I/opt/mpi/mpibull2-current/include
472#         FC       = ifort
473#         DEBFLGS  = #-check all
474#         OPT      =  -I/opt/mpi/mpibull2-current/include -g -traceback -warn -nofor_main -fp-model precise -traceback -fpe0 -keep
475#         OILIB   = -L/opt/intel/cmkl/10.0.1.014/lib/em64t -Wl,-rpath=/opt/intel/cmkl/10.0.1.014/lib/em64t -i-static -L/opt/mpi/mpibull2-current/lib -lmpi -L/usr/lib64 -libverbs -L/opt/mpi/mpibull2-current/lib/pmi -lpmi
476#         CC       = icc
477#         CFLAGS   = -g -I/opt/mpi/mpibull2-current/include -traceback
478#--------------------------------------------------------------------------
479#        COMPAQ/ALPHA Definitions
480#--------------------------------------------------------------------------
481#        COMPILER   = -DCOMPAQ
482#        CPP        = /bin/cpp
483#        FC         = f90
484#        DEBFLGS    =  # -check bounds -check overflow -g
485#        OPT        =  -fast -arch ev6 -fpe1
486#--------------------------------------------------------------------------
487#  CRAY Definitions
488#--------------------------------------------------------------------------
489#         COMPILER = -DCRAY
490#         CPP      = /opt/ctl/bin/cpp
491#         FC       = f90
492#         DEBFLGS  =
493#         OPT      =
494#--------------------------------------------------------------------------
495#   Linux/Portland Group Definitions
496#--------------------------------------------------------------------------
497#         CPP      = /usr/bin/cpp
498#         COMPILER =
499#         FC       = pgf90
500#         DEBFLGS  = -Mbounds -g -Mprof=func
501#         OPT      = #-fast  -Mvect=assoc,cachesize:512000,sse
502#--------------------------------------------------------------------------
503#  Intel Compiler Definitions
504#--------------------------------------------------------------------------
505#         CPP      = /usr/bin/cpp
506#         COMPILER = -DIFORT
507#         FC       = ifort
508#         CC       = icc
509#         CXX      = icc
510#         CFLAGS   = -O3
511#         DEBFLGS  = #-check all
512# Use 'OPT = -O0 -g' for fast compile toBASE_SETUP_DIRthe make
513# Use 'OPT = -xP' for fast run on em64t (Hydra and Guppy)
514# Use 'OPT = -xN' for fast run on ia32 (Salmon and Minke)
515#         OPT      = -O0 -g
516#         OPT      = -xP
517# Do not set static for use with visit!
518#         VISOPT   = -Wl,--export-dynamic
519#         LDFLAGS  = $(VISITLIBPATH)
520#--------------------------------------------------------------------------
521#  Intel/MPI Compiler Definitions (SMAST)
522#--------------------------------------------------------------------------
523#         CPP      = /usr/bin/cpp
524#         COMPILER = -DIFORT
525#         CC       = mpicc
526#         CXX      = mpicxx
527#         CFLAGS   = -O3
528#         FC       = mpif90
529#         DEBFLGS  = -check all -traceback
530# Use 'OPT = -O0 -g'  for fast compile toBASE_SETUP_DIRthe make
531# Use 'OPT = -xP' for fast run on em64t (Hydra and Guppy)
532# Use 'OPT = -xN' for fast run on ia32 (Salmon and Minke)
533#         OPT      = -O0 -g
534#         OPT      = -axN -xN
535#         OPT      = -O3
536# Do not set static for use with visit!
537#         VISOPT   = -Wl,--export-dynamic
538#         LDFLAGS  =  $(VISITLIBPATH)
539#--------------------------------------------------------------------------
540#  gfortran defs
541#--------------------------------------------------------------------------
542#         CPP      = /usr/bin/cpp
543#         COMPILER = -DGFORTRAN
544#         FC       = gfortran  -O3
545#         DEBFLGS  =
546#         OPT      =
547#         CLIB     =
548#--------------------------------------------------------------------------
549#  absoft / mac os x defs
550#--------------------------------------------------------------------------
551#         CPP      = /usr/bin/cpp
552#         COMPILER = -DABSOFT
553#         FC       = f90  -O3  -lU77
554#         DEBFLGS  =
555#         OPT      =
556#         CLIB     =
557#--------------------------------------------------------------------------
558#  IBM/AIX Definitions
559#--------------------------------------------------------------------------
560#         COMPILER = -DAIX
561#         CPP      = /usr/local/bin/cpp
562#         FC       = mpxlf90 -qsuffix=f=f90
563#         DEBFLGS  =  # -qcheck -C -g
564#         OPT      = -O -qarch=pwr4 -qtune=pwr4  -bmaxdata:0x80000000 -qhot -qmaxmem=8096
565#--------------------------------------------------------------------------
566#  APPLE OS X/XLF Definitions (G5)
567#--------------------------------------------------------------------------
568#         COMPILER = -DAIX
569#         CPP      = /usr/bin/cpp
570#         FC       =  /opt/ibmcmp/xlf/8.1/bin/xlf90 -qsuffix=f=f90
571#         DEBFLGS  =  # -qcheck -C -g
572#         OPT      = -O5 -qarch=g5 -qtune=g5  -qhot -qmaxmem=8096 -qunroll=yes -Wl,-stack_size,10000000
573#--------------------------------------------------------------------------
574#  ARCHER Intel/MPI Compiler
575#--------------------------------------------------------------------------
576#         CPP      = /usr/bin/cpp
577#         COMPILER = -DIFORT
578#         CC       = cc
579#         CXX      = CC
580#         CFLAGS   = -O3
581#         FC       = ftn
582##         DEBFLGS  = -check all
583#         OPT      = -O3
584#         COPTIONS = -c89
585#--------------------------------------------------------------------------
586#==========================================================================
587#  END USER DEFINITION SECTION
588#==========================================================================
589         CPPFLAGS = $(DEF_FLAGS) $(COMPILER)
590         FFLAGS = $(DEBFLGS) $(OPT)
591         MDEPFLAGS = --cpp --fext=f90 --file=-
592         RANLIB = ranlib
593         AR = ar rc
594#--------------------------------------------------------------------------
595#  CAT Preprocessing Flags
596#--------------------------------------------------------------------------
597           CPPARGS =  $(CPPFLAGS) $(DEF_FLAGS) $(FLAG_1) $(FLAG_2) \
598   $(FLAG_3) $(FLAG_4) $(FLAG_5) $(FLAG_6)  \
599   $(FLAG_7) $(FLAG_8) $(FLAG_9) $(FLAG_10) \
600   $(FLAG_11) $(FLAG_12) $(FLAG_13) $(FLAG_14) \
601   $(FLAG_15) $(FLAG_16) $(FLAG_17) $(FLAG_18) \
602   $(FLAG_19) $(FLAG_20) $(FLAG_21) $(FLAG_22) \
603   $(FLAG_23) $(FLAG_24) $(FLAG_25) $(FLAG_26) \
604   $(FLAG_27) $(FLAG_28) $(FLAG_29) $(FLAG_30) \
605   $(FLAG_31) $(FLAG_32) $(FLAG_33) $(FLAG_34) \
606   $(FLAG_35) $(FLAG_36) $(FLAG_37) $(FLAG_38) \
607   $(FLAG_39) $(FLAG_40) $(FLAG_41) $(FLAG_42) \
608   $(FLAG_43) $(FLAG_LAM)\
609   $(FLAG_101) $(FLAG_102) $(FLAG_103) $(FLAG_104) $(FLAG_105)\
610   $(FLAG_211) $(FLAG_212) $(FLAG_213) $(FLAG_251) $(FLAG_261)
611#--------------------------------------------------------------------------
612#  Libraries
613#--------------------------------------------------------------------------
614
615            LIBS  =	$(LIBDIR) $(CLIB)  $(PARLIB) $(IOLIBS)	$(DTLIBS)\
616			$(MPILIB) $(GOTMLIB) $(KFLIB) $(BIOLIB)	\
617			$(OILIB) $(VISITLIB) $(PROJLIBS) $(PETSC_LIB)
618
619            INCS  = 	$(INCDIR) $(IOINCS) $(GOTMINCS) $(BIOINCS)\
620			 $(VISITINCPATH) $(PROJINCS) $(DTINCS) \
621			 $(PETSC_FC_INCLUDES)
The key lines to change are:
74–75
174
458–465
After building FVCOM-ERSEM, we suggest you use a HPC scheduler, for example, SLURM to run example. An example of the SLURM script used here is given below:
 1#!/bin/bash --login
 2
 3#SBATCH --nodes=4
 4#SBATCH --ntasks-per-node=20
 5#SBATCH --threads-per-core=1
 6#SBATCH --job-name=estuary
 7#SBATCH --partition=all
 8#SBATCH --time=48:00:00
 9##SBATCH --mail-type=ALL
10##SBATCH --mail-user=your_mail@pml.ac.uk
11
12# Set the number of processes based on the number of nodes we have `select'ed.
13np=$SLURM_NTASKS
14
15# Export the libraries to LD_LIBRARY_PATH
16export LD_LIBRARY_PATH=$(readlink -f $WORKDIR/install/lib):$LD_LIBRARY_PATH
17
18set -eu
19ulimit -s unlimited
20
21# Number of months to skip
22skip=0
23
24# d53f5083 = FVCOM v3.2.2, M-Y, HEATING_ON, ceto
25binary=bin/fvcom
26grid=${grid:-"estuary"}
27casename="${grid}"
28
29# Make sure any symbolic links are resolved to absolute path
30export WORKDIR=$(readlink -f $(pwd))
31
32# Set the number of threads to 1
33#   This prevents any system libraries from automatically
34#   using threading.
35export OMP_NUM_THREADS=1
36
37# Magic stuff from the Atos scripts.
38export I_MPI_PIN_PROCS=0-19
39export I_MPI_EXTRA_FILESYSTEM=on
40export I_MPI_EXTRA_FILESYSTEM_LIST=gpfs
41export I_MPI_PMI_LIBRARY=/usr/lib64/libpmi.so
42
43# Change to the directory from which the job was submitted. This should be the
44# project "run" directory as all the paths are assumed relative to that.
45cd $WORKDIR
46
47if [ ! -d ./logs/slurm ]; then
48    mkdir -p ./logs/slurm
49fi
50mv *.out logs/slurm || true
51if [ -f ./core ]; then
52    rm core
53fi
54
55if [ ! -d ./output ]; then
56    mkdir -p ./output
57fi
58
59# Iterate over the months in the year
60
61    # Launch the parallel job
62    srun -n $np $binary --casename=$casename --dbg=0 > logs/${casename}-$SLURM_JOBID.log
63
64
65    # Check if we crashed and if so, exit the script, bypassing the restart
66    # file creation.
67    if grep -q NaN logs/${casename}-$SLURM_JOBID.log; then
68        echo "NaNs in the output. Halting run."
69        exit 2
70    fi
Example output from FVCOM-ERSEM
We provide two python scripts to demonstrate how to visualise both the
input files and the output files. The plotting uses PyFVCOM, we suggest
you ask for access here,
however, a version of the code is available on
GitHub as well as it being
pip installable.
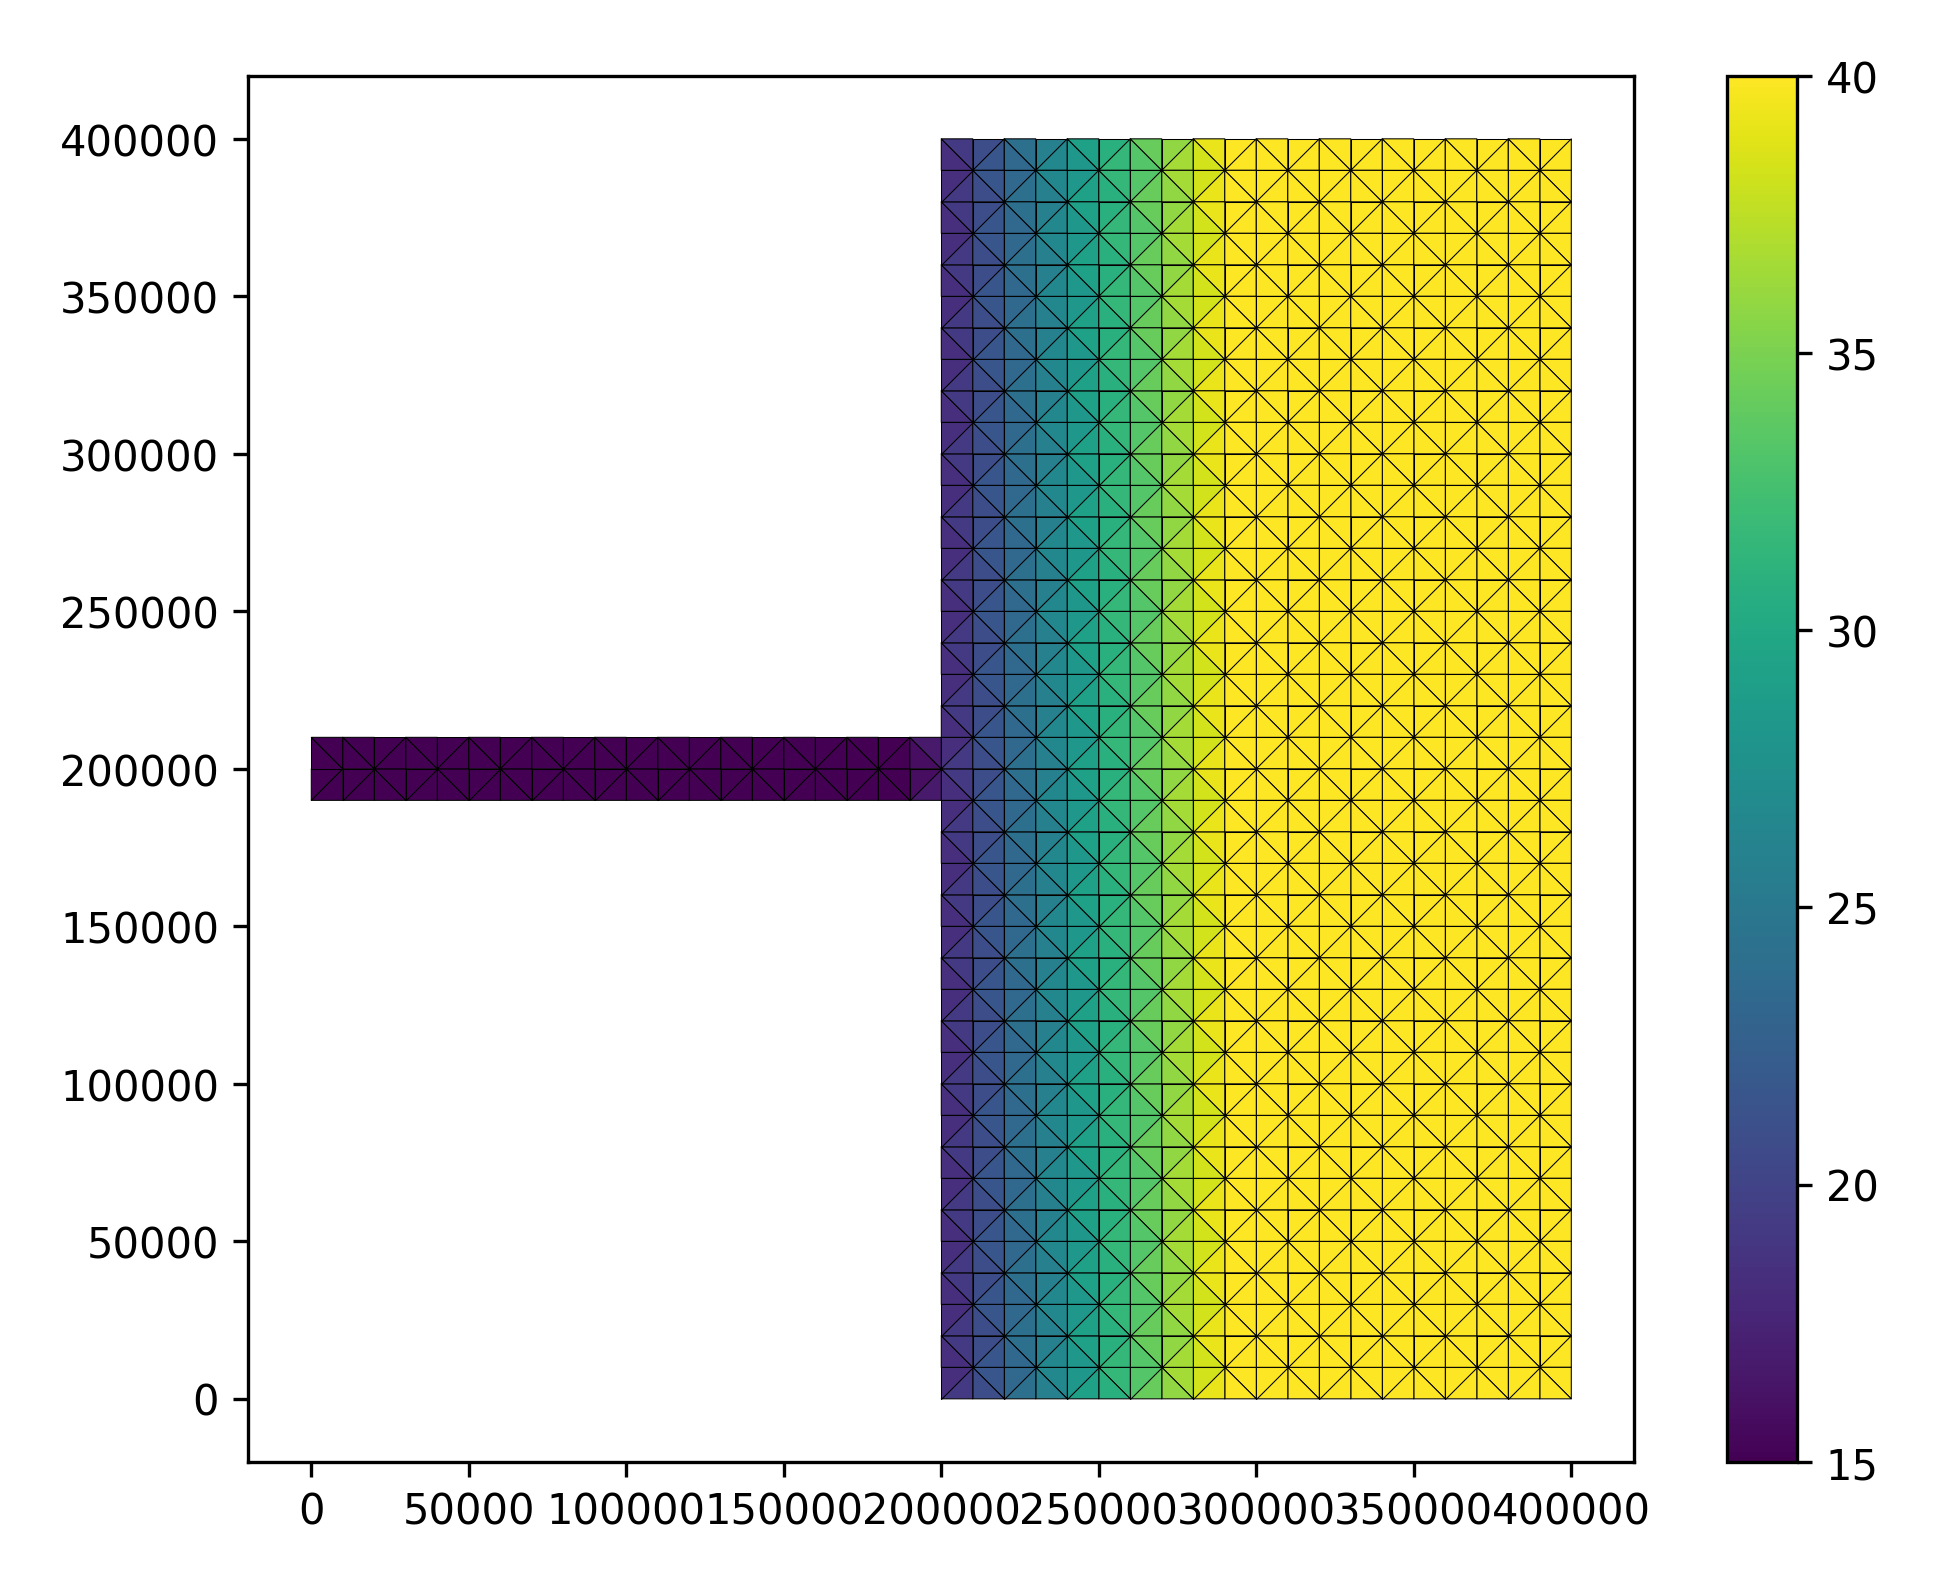
python input plot script
  1import os
  2import numpy as np
  3from netCDF4 import Dataset, num2date
  4from PyFVCOM.read import MFileReader
  5import matplotlib.pylab as plt
  6
  7# simple grid
  8dir_path = os.path.dirname(os.path.realpath(__file__))
  9estuary_path = os.path.join('model',
 10                            'estuary')
 11figure_path = os.path.join(estuary_path,
 12                           "figures")
 13fvcom_files = os.path.join(estuary_path,
 14                           'output',
 15                           'estuary_avg_0001.nc')
 16
 17
 18if not os.path.isdir(figure_path):
 19    os.makedirs(figure_path)
 20
 21print("Plotting mesh")
 22fig = plt.figure(figsize=(8, 6))
 23ax = fig.add_subplot(111)
 24dims = {'siglay': [0]}
 25fvcom = MFileReader(fvcom_files, dims=dims)
 26DATA = fvcom.grid.h
 27p1 = ax.tripcolor(fvcom.grid.x, fvcom.grid.y,
 28                  fvcom.grid.triangles, DATA, shading='flat', edgecolors='k')
 29plt.colorbar(p1)
 30ax.set_aspect('equal', 'box')
 31name = os.path.join(figure_path, 'bathymetry')
 32fig.savefig(name, bbox_inches='tight', pad_inches=0.2, dpi=300)
 33plt.close()
 34
 35print("Plotting wind forcing")
 36# check forcing
 37idtime = 100
 38fvcom_files = os.path.join(estuary_path,
 39                           'input',
 40                           '2D_forcing_50_years_20180927_new_grd.nc')
 41fvcom_frc = MFileReader(fvcom_files, variables=['uwind_speed',
 42                                                'vwind_speed',
 43                                                'short_wave',
 44                                                'net_heat_flux'])
 45uwind = np.squeeze(fvcom_frc.data.uwind_speed[idtime, :])
 46vwind = np.squeeze(fvcom_frc.data.vwind_speed[idtime, :])
 47
 48# wind speed
 49fig = plt.figure(figsize=(8, 6))
 50ax = fig.add_subplot(111)
 51scale = 75
 52p1 = ax.quiver(fvcom.grid.xc[0:-1:2],
 53               fvcom.grid.yc[0:-1:2],
 54               uwind[0:-1:2],
 55               vwind[0:-1:2],
 56               scale=scale,
 57               headlength=8,
 58               headaxislength=8,
 59               width=0.0015)
 60
 61arrow_legend = 2
 62plt.text(5e4, 6e4, '{} m/s'.format(str(arrow_legend)), fontsize=10)
 63q = ax.quiver(5e4, 5e4, arrow_legend, 0, scale=scale,
 64              headlength=8, headaxislength=8, width=0.0015)
 65ax.set_aspect('equal', 'box')
 66name = os.path.join(figure_path, 'wind_forcing')
 67fig.savefig(name, bbox_inches='tight', pad_inches=0.2, dpi=300)
 68plt.close()
 69
 70print("Plotting short wave")
 71# short wave
 72fvcom = fvcom_frc
 73fig = plt.figure(figsize=(8, 6))
 74ax = fig.add_subplot(111)
 75idnode = 500
 76shortwave = getattr(fvcom_frc.data, 'short_wave')
 77ax.plot(fvcom.time.datetime[0:8*365*1], shortwave[0:8*365*1, idnode])
 78ax.set_xlabel('Time (DD-MM HH)', fontsize='x-large')
 79ax.set_ylabel('W/m2')
 80name = os.path.join(figure_path, 'short_wave')
 81fig.savefig(name, bbox_inches='tight', pad_inches=0.2, dpi=300)
 82plt.close()
 83
 84
 85print("Plotting net heat flux")
 86# net heat flux
 87fig = plt.figure(figsize=(8, 6))
 88ax = fig.add_subplot(111)
 89idnode = 500
 90netheat = getattr(fvcom_frc.data, 'net_heat_flux')
 91ax.plot(fvcom.time.datetime, netheat[:, idnode])
 92ax.set_xlabel('Time (year)', fontsize='x-large')
 93ax.set_ylabel('W/m2')
 94name = os.path.join(figure_path, 'net_heat_flux')
 95fig.savefig(name, bbox_inches='tight', pad_inches=0.2, dpi=300)
 96plt.close()
 97
 98print("Plotting OBC ts")
 99# OBC T S
100obc_node = 40
101fvcom_files = os.path.join(estuary_path,
102                           'output',
103                           'estuary_avg_0001.nc')
104fvcom = MFileReader(fvcom_files, dims={'time': range(1)})
105fvcom_files_obc = os.path.join(estuary_path,
106                               'input',
107                               '2D_obc_ts_forcing.nc')
108nc = Dataset(fvcom_files_obc).variables
109fig = plt.figure(figsize=(10, 5))
110
111ax = fig.add_subplot(121)
112month = np.arange(1, 5)
113for month in month:
114    obc_temp = nc['obc_temp'][month+12*0, :, obc_node]
115    depth = fvcom.grid.siglay_z[:, obc_node]
116    if month in np.arange(1, 7):
117        ax.plot(obc_temp, -depth, label=month)
118    else:
119        ax.plot(obc_temp, -depth, '--', label=month)
120    ax.legend(loc='upper right')
121    ax.set_xlim(4.5, 33)
122    ax.set_xlabel('Temp (degC)')
123    ax.set_ylabel('Depth (m)')
124    ax.set_title('obc node {}'.format(str(obc_node)))
125
126ax = fig.add_subplot(122)
127month = np.arange(1, 5)
128for month in month:
129    obc_salt = nc['obc_salinity'][month+12*0, :, obc_node]
130    depth = fvcom.grid.siglay_z[:, obc_node]
131    if month in np.arange(1, 7):
132        ax.plot(obc_salt, -depth, label=month)
133    else:
134        ax.plot(obc_salt, -depth, '--', label=month)
135    ax.legend(loc='upper right')
136    ax.set_xlim(28, 37)
137    ax.set_xlabel('Salinity (psu)')
138    ax.set_ylabel('Depth (m)')
139    ax.set_title('obc node {}'.format(str(obc_node)))
140name = os.path.join(figure_path, 'obc_TS_node_{}'.format(str(obc_node)))
141fig.savefig(name, bbox_inches='tight', pad_inches=0.2, dpi=300)
142plt.close()
143
144print("Plotting river forcing")
145# River forcing
146tracer_f = "2D_bio_River_50_years_20180821_monthly_river_2_tracers_T1T2.nc"
147fvcom_file_river = \
148    os.path.join(estuary_path,
149                 'input',
150                 tracer_f)
151nc = Dataset(fvcom_file_river)
152nc.variables.keys()
153varlist = ['river_flux', 'river_temp', 'river_salt', 'river_sed',
154           'N4_n', 'N3_n']
155fig = plt.figure(figsize=(12, 8))
156time_var = nc['time']
157dtime = num2date(time_var[:], time_var.units)
158for var, num in zip(varlist, np.arange(1, 3)):
159    ax = fig.add_subplot(3, 2, num)
160    if var in ('river_flux'):
161        river_var = np.sum(nc[var][:, :], 1)
162    else:
163        river_var = nc[var][:, 0]
164    ax.plot(dtime, river_var)
165    ax.set_title('{} ({})'.format(nc[var].long_name, nc[var].units))
166    ax.set_xlabel('Time (month)')
167    plt.tight_layout()
168name = os.path.join(figure_path, 'river_flux1')
169fig.savefig(name, bbox_inches='tight', pad_inches=0.2, dpi=300)
170plt.close()
171
172varlist = ['N1_p', 'N5_s', 'O3_c', 'O3_TA', 'O3_bioalk', 'O2_o']
173fig = plt.figure(figsize=(12, 8))
174for var, num in zip(varlist, np.arange(1, 3)):
175    ax = fig.add_subplot(3, 2, num)
176    river_var = nc[var][:, 0]
177    ax.plot(dtime, river_var)
178    ax.set_title('{} ({})'.format(nc[var].long_name, nc[var].units))
179    ax.set_xlabel('Time (month)')
180    plt.tight_layout()
181name = os.path.join(figure_path, 'river_flux2')
182fig.savefig(name, bbox_inches='tight', pad_inches=0.2, dpi=300)
183plt.close()
Using the input python plot script, we generate the domain as follows:
python output plot script
  1import os
  2import glob
  3import numpy as np
  4
  5from PyFVCOM.read import MFileReader
  6from pythontools.visual.utils import colourmap
  7import PyFVCOM as pf
  8from PyFVCOM.plot import Plotter, Depth
  9import matplotlib.pyplot as plt
 10import matplotlib
 11
 12project0 = 'estuary'
 13casename = 'ideal'
 14base = os.path.join('model', 'estuary')
 15experiment = ''
 16suffix = ''
 17level_label = 'vertical_transect'
 18level_label2 = 'surface'
 19fname = 'estuary_avg_0001.nc'
 20fpath1 = os.path.join(base, 'output', fname)
 21fvcom_files = sorted(glob.glob(fpath1))
 22
 23noisy = True
 24if noisy:
 25    print(fpath1, flush=True)
 26    print(fvcom_files, flush=True)
 27
 28if not fvcom_files:
 29    raise Exception('Cannot find FVCOM output: {}'.format(fpath1))
 30
 31MyFile = fvcom_files
 32
 33plot_map = True  # to plot horizontal map
 34save_plot = True  # to save the plot
 35
 36fvcom = MFileReader(MyFile)
 37
 38varlist = ['GPP', 'temp', 'salinity',
 39           'P1_Chl', 'O3_c', 'R6_c', 'N1_p', 'N3_n',
 40           'tracer1_c', 'total_chl']
 41
 42clims = {
 43    'temp': [5, 25],
 44    'O3_c': [1900, 2300],
 45    'R6_c': [0, 200],
 46    'salinity': [0, 31]
 47}
 48
 49# plot all time series, maybe too much
 50time_indices = range(0, fvcom.dims.time)
 51level = 0  # select vertical layer (0: surface, -1: bottom) if plot_map = True
 52
 53plt.rcParams['axes.facecolor'] = '0.6'
 54for var in varlist:
 55    baseDir = os.path.join(base, 'figures', var)
 56    baseName = os.path.join(baseDir, var)
 57
 58    if var in ('uv'):
 59        plotvars = ['u', 'v']
 60    elif var == 'total_chl':
 61        plotvars = ['P1_Chl', 'P2_Chl', 'P3_Chl', 'P4_Chl']
 62    elif var == 'netPP':
 63        plotvars = ['P1_Chl', 'P2_Chl', 'P3_Chl', 'P4_Chl']
 64    elif var == 'GPP':
 65        plotvars = ["P1_fO3PIc", "P2_fO3PIc", "P3_fO3PIc", "P4_fO3PIc"]
 66    else:
 67        plotvars = [var]
 68
 69    if noisy:
 70        print('Loading {} data from netCDF... '.format(var),
 71              end='',
 72              flush=True)
 73        if save_plot:
 74            print('Saving files to {}'.format(baseDir), flush=True)
 75            if not os.path.isdir(baseDir):
 76                os.makedirs(baseDir)
 77        print('Working on {}...'.format(var), flush=True),
 78
 79    fvcom = MFileReader(MyFile, variables=plotvars)
 80    fvcom.grid.lon = fvcom.grid.x
 81    fvcom.grid.lat = fvcom.grid.y
 82    positions = np.array(((0, 2e5), (4e5, 2e5)))
 83    indices, distance = fvcom.horizontal_transect_nodes(positions)
 84    cmap = colourmap(var)
 85
 86    if var in ('total_chl'):
 87        setattr(
 88            fvcom.data, var, fvcom.data.P1_Chl + fvcom.data.P2_Chl +
 89            fvcom.data.P3_Chl + fvcom.data.P4_Chl)
 90        attributes = type('attributes', (object, ), {})()
 91        setattr(attributes, 'long_name', 'Total chlorophyll')
 92        setattr(attributes, 'units', fvcom.atts.P1_Chl.units)
 93        setattr(fvcom.atts, var, attributes)
 94    elif var in ('total_food'):
 95        setattr(fvcom.data, var, fvcom.data.P1_c + fvcom.data.P2_c
 96                + fvcom.data.P3_c + fvcom.data.P4_c + fvcom.data.Z5_c
 97                + fvcom.data.Z5_c + fvcom.data.R8_c + fvcom.data.R6_c
 98                + fvcom.data.R4_c)
 99        attributes = pf.utilities.general.PassiveStore()
100        setattr(attributes, 'long_name', 'Total mussel food ')
101        setattr(attributes, 'units', fvcom.atts.P1_c.units)
102        setattr(fvcom.atts, var, attributes)
103        attributes = pf.utilities.general.PassiveStore()
104        setattr(fvcom.data, var, getattr(fvcom.data, var) / 1000000)
105        setattr(attributes, 'long_name', 'Integrated Total mussel food')
106        setattr(attributes, 'units', 'Kg\C')
107        setattr(fvcom.atts, var, attributes)
108    elif var in ('GPP'):
109        setattr(fvcom.data, var, fvcom.data.P1_fO3PIc +
110                fvcom.data.P2_fO3PIc + fvcom.data.P3_fO3PIc +
111                fvcom.data.P4_fO3PIc)
112        attributes = pf.utilities.general.PassiveStore()
113        setattr(attributes, 'long_name', 'Gross Primary Productivity')
114        setattr(attributes, 'units', fvcom.atts.P1_fO3PIc.units)
115        setattr(fvcom.atts, var, attributes)
116
117    if var in clims:
118        clim = clims[var]
119    else:
120        clim = [
121            np.nanpercentile(getattr(fvcom.data, var), 3),
122            np.nanpercentile(getattr(fvcom.data, var), 97)
123        ]
124    plot = Plotter(fvcom,
125                   figsize=(20, 20),
126                   res='i',
127                   cb_label='{} ({})'.format(
128                       getattr(fvcom.atts, var).long_name,
129                       getattr(fvcom.atts, var).units),
130                   cmap=cmap,
131                   vmin=clim[0],
132                   vmax=clim[1],
133                   cartesian=True)
134
135
136
137    # Plot a temperature transect between two locations.
138    depth_plot = Depth(fvcom,
139                       figsize=(20, 9),
140                       cb_label='{} ({})'.format(
141                            getattr(fvcom.atts, var).long_name,
142                            getattr(fvcom.atts, var).units),
143                       cmap=cmap)
144    depth_plot.axes.set_xlabel('Distance (km)')
145    depth_plot.axes.set_ylabel('Depth (m)')
146    for ntime in time_indices:
147        print("Time step index: {}".format(ntime))
148
149        # Make a plot of the surface temperature.
150        plot.plot_field(np.squeeze(getattr(fvcom.data, var))[ntime, level, :])
151        plot.axes.set_title(
152            fvcom.time.datetime[ntime].strftime('%Y-%m-%d %H:%M:%S'))
153
154        if save_plot:
155            plot.figure.savefig('{}{}_{}_{}_{:04d}.png'.format(
156                baseName, suffix, experiment, level_label2, ntime),
157                bbox_inches='tight',
158                pad_inches=0.2,
159                dpi=120)
160
161        # fill_seabed makes the part of the plot below the seabed grey.
162        # plot.plot_slice(distance / 1000,  # to kilometres from metres
163        depth_plot.plot_slice(
164            fvcom.grid.lon[indices] / 1000,  # to kilometres from metres
165            fvcom.grid.siglay_z[:, indices],
166            getattr(fvcom.data, var)[ntime, :, indices],
167            fill_seabed=True,
168            vmin=clim[0],
169            vmax=clim[1])
170        depth_plot.axes.set_title(
171            fvcom.time.datetime[ntime].strftime('%Y-%m-%d %H:%M:%S'))
172        depth_plot.axes.set_xlim(
173            right=(fvcom.grid.lon[indices] /
174                   1000).max())  # set the x-axis to the data range
175
176        if save_plot:
177            depth_plot.figure.savefig('{}{}_{}_{}_{:04d}.png'.format(
178                baseName, suffix, experiment, level_label, ntime),
179                bbox_inches='tight',
180                pad_inches=0.2,
181                dpi=120)
The following plots videos are produced from the plots produced by the
python output plot script.
Gros primary production

Phosphate phosphorus

Nitrate nitrogen
Carbonate total dissolved inorganic carbon
Diatoms chlorophyll

Medium-sized POM carbon

Salinity
Temperature
Total chorophyll
Tracer1 concentration